I have images on the computer I'd love to transfer and then embroider. I'm looking for easy ways to do that.
I've been neglecting my dishes, so instead of doing those I tried out a couple transfer methods tonight. One didn't work at all and the other didn't work very well. The first was the Acetone Toner Transfer Method. I reversed an Urban Threads image by scanning it, a lucky clover one and printed it out with my laser printer. Then I taped it to a 100% cotton floursack towel. Then your supposed to get a cotton ball wet with nail polish remover and go over it, followed by the back of a spoon. (for complete instructions send me a message with your email and I'll send it to you). Well, this didn't work at all! My nail polish remover says it has acetone in it, but maybe not enough.
The second method I used was the light box transfer method. I found a clear plastic box, turned it on its side and put a floor lamp sideways on the floor into the box, sans shade. I don't have a table lamp. Then I put down my image, not reversed, and traced it with Crayola fine point washable markers on the floursack towel. Well, the markers bled quite a bit. (fabric on top of paper on top of clear box) I should have taped everything down too. I didn't like how it turned out so its on top of the washer. I will see if the colors really do wash out!
So now I'm pretty frustrated. I really want to try Transfer-Eze, when I have a spare $15 or so. Here is the link to the tutorial: http://zuill.us/andreablog/2010/01/29/transfer-eze-a-new-product-for-embroiderers/ Here is a place you can buy it: http://www.originalcreationsquiltshop.com/shop/TransferEze.htm
So for now I'm sticking to iron-on transfers. :(
Does anyone know any other methods that work for you?
Thursday, July 29, 2010
Friday, July 23, 2010
A Princess Among Dragons
For the July/August Challenge in the Art Challenges~ group at http://creativesouls.ning.com/. DMC floss backstitched on cardstock with Far East Matstack papers. Stencil designs by www.spraypaintstencils.com.
What really helped me finish this was Dan Goodwin's suggestion on Coach Creative Space http://coachcreativespace.ning.com/ to work on one project at a time through to the finish. Of course you can't always do that. Actually I think it was in one of his blog posts. This is just embroidery on paper or Dutch Embroidery. I just printed out the stencil designs and poked holes along the lines in pink, green and purple cardstock. I used black DMC floss on the dragon and variegated floss on the rose and stem. After sewing I stuck it all together with double-sticky tape. I used DCWV papers around the edges. Here are pictures of the process.


The back.


Thursday, July 22, 2010
Fall Napkins
I've only done two out of six of these so far. They are turning out nicely. It is just a simple split stitch design. I got the leaf designs free off the internet. (pattern excerpt from Small Stitches Booklette by Carina Envoldsen-Harris, www.wardi.dk ) I printed out the patterns on Sulky Solvy and hooped them, then pulled out the little pieces of paper after stitching.


I'm using DMC floss I had on hand. The fabric napkins are from Target and they are died with Apple Green Rit Dye.


I'm using DMC floss I had on hand. The fabric napkins are from Target and they are died with Apple Green Rit Dye.
Saturday, July 17, 2010
Decoupaged Planter
I finished the decorated coffee can for my mom to use as a planter. I used a DCWV stack called Taj Mahal. It has different Indian themed papers. I used 6 different papers from that and taped yellow construction paper with double-sticky tape to the can. I almost finished up a jar of Matte Mod Podge with another 10 layers on this can. I picked out the colors especially for my mom. Her birthday is in a month. I think I've got decoupage out of my system for awhile. On with the pictures!


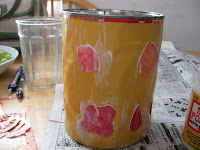


 And here's the finished project!


Thursday, July 15, 2010
Creative Update
I'm currently decoupaging a medium size coffee can for my mom. It's going to be an indoor pot for a plant (I don't have any Outdoor Mod Podge). It's her birthday next month. I've been doing a little embroidery on Beth's hot pink apron. When I was in Olympia last I bought some more supplies, including crayons and fabric (evil chuckle commences). Yes, I have plans! I should probably finish the projects I've started. There is an embroidered leaves on napkins project next to my living room chair. Each one has a simple leaf design. Already finished two. Will post pictures soon. Found a laminating machine on Amazon for only $40 plus the laminating sheets are another $15. I can't really justify it right now. What do you think? It cost about $6.50 the last time I had my bookmarks laminated at Staples. What would you laminate if you had a laminating machine? Crafting is a total stress release for me. I've had a stressful week. Got into it with my best friend. *sigh* I think I'm making a habit of creating when I'm upset. Not a bad strategy at all.
Saturday, July 10, 2010
"Blue Christmas" Box - Decoupage
Here's my first Christmas present for the year. I realize it's only July! I had this navy blue box sitting around. I decided to decoupage it. I used some papers from last Christmas, from a DCWV mat stack. Also some glitter papers, the same brand, really too heavy to use. The corners turned up on the glitter paper. I just got some Matte Mod Podge, which is what I used for this project. I applied about 5 coats when I added the layers of paper and 5 more to finish. I just cut out random shapes and strips of paper. It turned out pretty good. I might add a layer of varnish later if I can figure out what kind to use. It took about 48 hours for it all to dry, in 2 hour increments and overnight twice.
My kitchen table, at the start of the project:


Then I added the holiday papers:

 This is the finished box with the glitter papers and layers of Mod Podge:

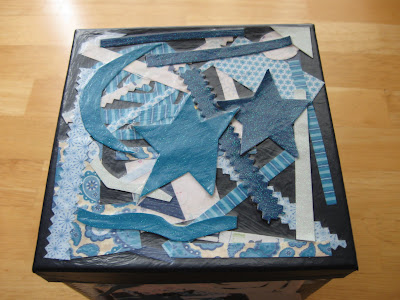

This is for someone who likes blue. Hmmm......!
My kitchen table, at the start of the project:


Then I added the holiday papers:


This is for someone who likes blue. Hmmm......!
Monday, July 5, 2010
Starfish Project Update
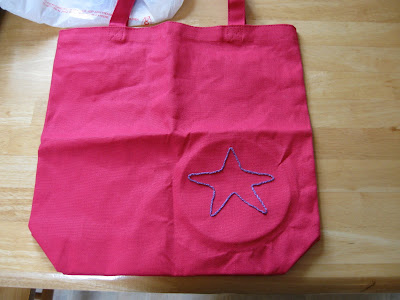
Here are the pics of the Starfish tote bag. My friend Kari's nickname is Starfish. I have the one side finished, with the word Starfish on it in my handwriting. I just used a pencil and wrote it on, then embroidered it. The other side has one starfish on it and I will be embroidering 3 more smaller starfish on that side. It is all done in split stitch and french knots. I love to do both those stitches! I hate the heavy tote bag fabric though. On with the pictures!


Subscribe to:
Comments (Atom)